Create new upload
See the quick start guide for a short introduction to publishing an upload in 3 simple steps. This guide goes in further detail about how to create a new record, and subsequent sections cover each part in detail.
- Create a new upload
- Add/remove files
- Fill in metadata
- Save for later
- Set visibility
- Apply an embargo
- Preview before publishing
- Publish
- Delete a draft
Create a new upload
1
Click the plus icon in the header, and select New upload from the drop-down menu.

2
You will now see the deposit form where you can upload files, add metadata, set restrictions and save/publish your upload.

Add/remove files
1
Click the Upload files button, or drag and drop one or more files onto the drop zone to start uploading files. You can upload up to 100 files and a total of 50GB.
ATTENTION: After the record is published you can only add, remove or modify files by yourself within 45 days.
![]()
2
You can delete a file by clicking the icon.

Fill in metadata
1
Fill in the minimal required metadata fields under "Basic information". The fields are marked with a small red star. Refer to describe records for a detailed guide to all fields in the form.

2
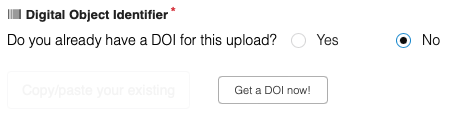
Digital Object Identifier (DOI): If your upload already has a DOI, please answer "yes" to the question and copy/paste the existing DOI. Note, make sure the existing DOI is for the same object. For instance, if you upload a supporting dataset to a journal article, you should NOT use the journal article DOI.
If your upload does not have a DOI, answer "no" to the question. The "Get a DOI now!" button allows you to reserve a DOI, so you can include it into the files you upload if so desired (e.g. to include the DOI into a PDF). ATTENTION: If you delete the draft upload, the reserved DOI will be lost.
The DOI will only be registered once the record is published.
3
Resource type: Select the type of resource you have uploaded (e.g publication, dataset, software, poster, presentation, ...). For mixed type uploads, choose the type which you think best reflects the nature of the upload.

4
Title: Provide a clear and informative title for your upload.

5
Publication date: Provide the publication date of your upload. The publication date is when your upload was first published (made available to a public audience). By default, the publication date is set to the date you create the draft upload.

6
Creators: Click the Add creator button to add one or more creators/authors of the record. Creators appear in the citation string of your upload. A creator can be a person or organisation. You can search for creators (based on ORCID profiles for persons and ROR registry for organisations), or you can manually enter their information. Name identifiers (e.g. ORCIDs, GNDs) are validated. You can add one or more affiliations for a creator, and if desired you can assign a role for each creator. After one or more authors have been added, you can edit, remove and reorder creators from the deposit form.

Save for later
1
Click Save draft to save your deposit and validate the entered data.

2
Any error message will be displayed on the top.

3
Once saved, you can close the browser window and come back later to complete the upload. See manage records for how to find you upload again.
Set visibility
1
Set the desired visibility of the files in the record once published (note, the metadata is always publicly accessible).

2
You can choose between public or restricted visibility for the files. You can share restricted files after publishing.
Apply an embargo
1
Set the files visibility to restricted and check the Apply an embargo.

2
Provide an Embargo until date. The files will automatically be made publicly available on the chosen date at midnight UTC. Optionally, provide a reason for the embargo.
3
Users viewing the record landing page will be made aware of the embargo period.
Preview before publishing
1
Click the Preview button to see how the record will look like once published. Note, you have to provide the minimal required metadata to be able to preview the record.
Publish
1
Click Publish once you are ready to publish.
2
Confirm that you wish to publish. Once published, you can edit the metadata of the record at any time but you can only edit the files within 45 days.

Delete a draft
1
At any point before publishing, you can delete the draft upload by clicking the Delete button.

2
ATTENTION: You will lose any reserved DOI if you delete the draft, and any uploaded files will also be removed.